Cutting a 2-year-old or 3-year-old baby’s hair can be both an exciting milestone and a daunting task for parents. While it marks a transition from babyhood to toddlerhood, it often involves a squirming, unpredictable little one. Many cultures around the world have traditions associated with a child’s first haircut. In Hinduism, for instance, the mundan ceremony (often performed in the first or third year) involves shaving the child’s head to symbolize purification and a fresh start. Similarly, some Orthodox Jewish traditions wait until a boy turns three for his first haircut, called an upsherin, marking the beginning of formal education. Regardless of cultural significance, the practical aspect remains: how do you get those wiggles to stop long enough for a decent trim?
It’s also worth noting that a baby’s hair texture can change significantly during their early years. Many infants are born with fine, soft hair (vellus hair or lanugo) that often gives way to a coarser, more permanent texture (terminal hair) around the toddler years. This change in texture, combined with rapid growth, often necessitates a haircut.
This guide will provide you with a comprehensive, step-by-step approach to cutting your toddler’s hair at home, focusing on safety, comfort, and achieving a decent look.
Preparation is Key: Setting the Stage for Success
The secret to a successful toddler haircut lies in thorough preparation. A well-prepared environment and a happy child will make the process much smoother.
- Choose the Right Time: Select a time when your child is well-rested, fed, and in a good mood. Avoid nap times, meal times, or when they are tired or irritable. Morning after breakfast is often a good window.
- Gather Your Supplies: Having everything within arm’s reach prevents you from having to leave your child unattended, even for a second.
- Sharp Hair-Cutting Scissors: Do not use regular household scissors. Dedicated barber’s scissors are sharper and will give a cleaner cut, preventing split ends and pulling. You can find these at pharmacies, beauty supply stores, or online.
- Fine-Tooth Comb: Essential for sectioning and holding hair.
- Spray Bottle with Water: To dampen the hair for easier cutting.
- Towels or Hairdressing Cape: To catch clippings and keep hair off your child’s clothes. A towel secured with a clip or even a button-up shirt that can be easily removed is ideal.
- Booster Seat or High Chair: A stable, comfortable seating option at an appropriate height. A high chair can be great for containment.
- Distractions! This is paramount.
- Favorite toys, books.
- Tablet or phone with a favorite cartoon or game (place it strategically so their head is in a good position).
- Special snack (e.g., a lollipop, a small bowl of cereal).
- A mirror, so they can see what you’re doing (some kids are mesmerized).
- Another adult (if possible) to distract or help hold.
- Small Bag or Envelope: To save a lock of hair if you wish to keep it as a memento.
- Vacuum Cleaner or Broom: For easy cleanup afterwards.
- Create a Positive Atmosphere: Talk to your child about what’s going to happen in a cheerful, reassuring tone. Make it sound like a fun activity. Let them touch the comb (not the scissors!). Praise them frequently for sitting still.
Step-by-Step Guide: Cutting with Scissors
For most toddlers, especially for the first few haircuts, using scissors is often preferred for more control and less intimidation than clippers.
- Position Your Child:
- Seat your child comfortably and securely in a booster seat or high chair.
- Drape the towel or cape around their shoulders, ensuring it’s not too tight around their neck.
- Engage their chosen distraction immediately. A TV or tablet placed slightly above eye level can encourage them to keep their head still and straight.
- Dampen the Hair:
- Lightly mist your child’s hair with the spray bottle. Hair is easier to cut when damp, but not soaking wet, as it tends to clump. Be mindful that wet hair appears longer than dry hair, so cut conservatively.
- Start with the Back (if possible):
- Many parents find it easiest to start with the back, as it’s less visible to the child and allows them to get used to the sensation.
- Using your comb, take a small horizontal section of hair at the nape of the neck.
- Hold the section between your index and middle fingers, pulling it gently away from the head. Your fingers act as a buffer and a guide for length.
- Cut straight across below your fingers. Start by taking off less than you think you need; you can always cut more later.
- Continue working your way up the back, taking small horizontal sections. Use the previously cut section as a guide for length to ensure an even cut.
- Move to the Sides:
- Once the back is done, move to one side. Take a small vertical section of hair near the ear.
- Comb the hair straight down.
- Use your fingers to hold the hair, shielding the ear with your hand as much as possible.
- Cut vertically or at a slight angle for a softer, blended look, rather than a blunt line.
- Repeat for the other side.
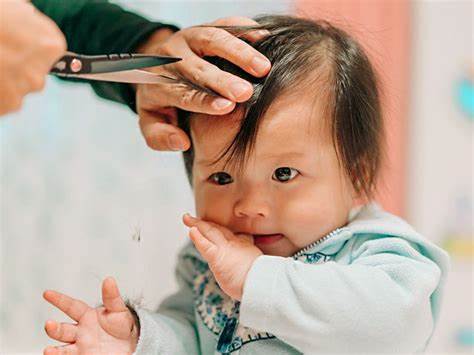
- Tackle the Top and Front (Bangs):
- This is often the trickiest part due to visibility and the child’s potential squirming.
- For the top, take small horizontal sections, comb straight up, and trim off the desired length. Use the previous section as a guide.
- For bangs, decide on the desired length before cutting. Remember, bangs tend to spring up when dry.
- Take a small section of hair in the front. Comb it straight down.
- Hold the hair between your fingers, then cut straight across or with a slight angle for a softer fringe.
- Pro Tip: For a less blunt look, try point cutting: hold the scissors vertically and snip into the ends. This creates a softer edge.
- Be extra cautious around the eyes.
- Blending and Finishing Touches:
- Once the main cutting is done, gently comb all the hair down.
- Look for any uneven spots or stray hairs. Trim these carefully.
- For a blended look, you can try “cutting up” into the hair ends with your scissors held vertically, rather than horizontally.
- Don’t aim for perfection. A slight unevenness is natural for a home haircut on a toddler!
Using Clippers (for Shorter Styles)
If you prefer a shorter, more uniform cut, clippers can be faster, but they can also be noisier and more intimidating for some children.
- Preparation is the same. Ensure your child is calm and distracted.
- Choose the Right Guard: Clippers come with different guard sizes (e.g., #1, #2, #3, etc.) that determine the length of the cut. Start with a longer guard than you think you need (e.g., a #3 or #4) – you can always go shorter.
- Start at the Back/Sides:
- Gently place the clippers against the child’s head at the nape of the neck.
- Move the clippers slowly and steadily upwards, against the direction of hair growth.
- Go over the same area multiple times to ensure an even cut.
- Work around the sides, moving upwards.
- Blending (if cutting top with scissors): If you’re doing a longer top with clippered sides, use a slightly longer guard for the upper sides, then blend the transition zone.
- Finish the Top (with scissors): It’s generally not recommended to use clippers on the very top or front of a toddler’s head for longer styles, as it’s harder to control and blend. Use scissors as described above.
Safety Tips for Cutting Baby Hair
- Always Use Sharp Scissors/Clippers: Dull tools pull hair and can be more dangerous.
- Constant Supervision: Never leave sharp tools or your child unattended.
- Keep Fingers Between Scissors and Scalp: When cutting with scissors, your fingers should always be between the hair you’re cutting and your child’s head.
- Small Sections: Work with small sections of hair to maintain control.
- Protect Ears: Use your free hand to gently fold or shield the ears when cutting around them.
- Take Breaks: If your child becomes agitated or restless, take a break. Don’t push it. Resume when they are calm again.
- Patience and Positive Reinforcement: Your demeanor will influence your child. Stay calm, positive, and praise them for their cooperation, no matter how small.
- Manage Expectations: Your goal is a functional, neat haircut, not a salon-perfect style. Embrace the “home haircut” charm.
Key Entities:
- 2-year-old/3-year-old baby: Refers to toddlers in this specific age range, known for their developing independence and potential restlessness.
- Hair-cutting scissors: Specialized sharp scissors designed for cutting hair, offering a cleaner cut than household scissors.
- Clippers: Electric hair-cutting tools, often used with guards to achieve uniform short lengths.
- RAM (Random Access Memory): (Self-correction based on previous response. This entity is irrelevant to the current topic and should not be included.)
- Vellus hair: Fine, soft, often unpigmented hair present on babies, which typically sheds and is replaced by terminal hair.
- Terminal hair: The coarser, more pigmented hair that grows after vellus hair is shed, making up the adult hair.
- Mundan ceremony: A Hindu tradition where a baby‘s head is shaved, often in the first or third year, symbolizing purification.
- Upsherin: An Orthodox Jewish ceremony, usually at a boy’s third birthday, marking his first haircut and the beginning of formal Jewish education.
FAQ Section
Q1: How often should I cut my 2 or 3-year-old’s hair?
The frequency depends entirely on how fast their hair grows and the desired style. Some toddlers might need a trim every 2-3 months, while others with slower-growing hair might go 6 months or longer between cuts. Look for hair falling into their eyes or looking unruly.
Q2: My toddler screams and won’t sit still for a haircut. What should I do?
This is very common! Ensure you’ve chosen the right time (not tired or hungry), use maximum distraction (tablet, special snack), and have another adult help if possible. If they are truly distressed, stop and try again another day. Sometimes, a short, frequent trim is better than one long, stressful session. Consider doing it while they’re sleeping if you’re comfortable and confident with the scissors.
Q3: Can I use regular household scissors to cut my baby’s hair?
It is highly not recommended. Household scissors are typically not sharp enough for hair and can pull, snag, or damage the hair, leading to split ends. Investing in a good pair of sharp, hair-cutting scissors will make the process safer and result in a much cleaner cut.
Q4: Will cutting my baby’s hair make it grow back thicker?
This is a common myth. Cutting hair does not affect the hair follicles under the scalp, which are responsible for hair growth. Therefore, cutting hair does not make it grow back thicker, faster, or different in texture. Any perceived change in thickness is usually due to the hair’s natural maturation process from vellus to terminal hair.
Q5: What if I make a mistake and the cut is uneven?
Don’t panic! Hair grows back. For toddlers, small imperfections are usually not very noticeable. Focus on making it neat enough to keep hair out of their eyes and looking tidy. You can always trim more later, or if it’s significantly uneven, consider taking them to a professional children’s hairstylist for a fix-up.