Category: Uncategorized

  • How to Dress a Baby for Sleep in Winter

    How to Dress a Baby for Sleep in Winter

    Winter nights bring colder temperatures, and as a parent, one of your main worries is keeping your baby warm enough while they sleep. But it’s also crucial to avoid overheating and follow safe sleep guidelines. Loose blankets are not safe for babies due to the risk of suffocation and Sudden Infant Death Syndrome (SIDS). So, how do you dress your little one for a cozy, safe night’s sleep when it’s cold outside?

    I remember feeling so unsure about this with my first baby. Was she too cold? Was she too hot? Checking on them constantly becomes part of the night. The key is layering and using the right sleepwear. Let’s break down how to do it.

    Step 1: Determine the Room Temperature

    The first step is to know how warm or cold your baby’s room is. The recommended temperature for a baby’s sleep environment is typically between 68-72°F (20-22°C).

    • Use a simple room thermometer to check the temperature in the nursery.
    • Aim to keep the room within that ideal range if possible. Adjusting your home’s thermostat can help.

    Knowing the actual temperature helps you decide on the right amount of layers. If the room is colder or warmer than the ideal, you’ll adjust the sleepwear.

    Step 2: Understand TOG Ratings

    This was a game-changer for me when I learned about it. Many baby sleep items, especially sleep sacks, have a TOG (Thermal Overall Grade) rating. This number tells you how warm the fabric is. A higher TOG means warmer material.

    • Lower TOG (like 0.5 or 1.0): Lighter, for warmer room temperatures or summer.
    • Higher TOG (like 2.5 or 3.5): Warmer, for colder room temperatures or winter.

    Think of TOG like the rating on a sleeping bag. It helps you match the sleepwear to the room temperature. You’ll find charts online (and sometimes on the product packaging) suggesting which TOG to use based on the room temperature and what the baby is wearing underneath.

    How to Use TOG: Check the TOG rating of the sleep sack or wearable blanket you plan to use. Refer to a reliable TOG chart to see what base layers are recommended for your room temperature with that specific TOG rating.

    Step 3: Choose the Base Layer

    This is the layer your baby wears underneath the sleep sack.

    • Onesie: A simple, short-sleeved or long-sleeved bodysuit.
    • Footie Pajamas: A one-piece outfit that covers legs and feet.

    In winter, a long-sleeved cotton or bamboo onesie or footie pajamas made from breathable material often works well as a base layer. Avoid fleece pajamas as a base layer under a warm sleep sack unless the room is very cold, as they can sometimes lead to overheating.

    How to Choose: Select a comfortable, breathable base layer based on the room temperature and the TOG of the outer layer you plan to use. For colder rooms, footie pajamas offer warmth for the legs and feet.

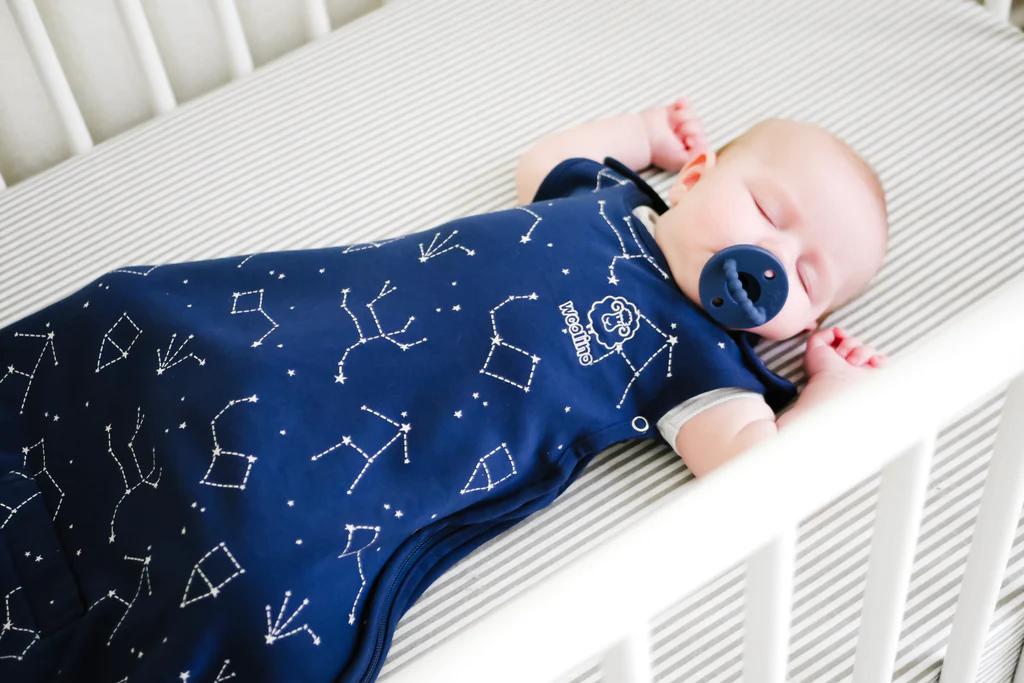
    Step 4: Add the Outer Layer: The Sleep Sack

    This is the safest way to provide warmth over the base layer instead of using blankets. A sleep sack (also called a wearable blanket) is a garment worn over pajamas that zips up, keeping the baby warm without posing a suffocation risk.

    • Choose a sleep sack with an appropriate TOG rating for your room temperature (as determined in Step 2). For typical winter room temperatures (68-72°F), a 1.0 or 2.5 TOG is common. If your room is consistently colder, you might consider a 2.5 or even 3.5 TOG, paired with a lighter base layer.
    • Ensure the sleep sack fits correctly around the neck and arms so the baby cannot slip down inside.

    How to Use a Sleep Sack: Dress your baby in their base layer, then place them inside the sleep sack and zip it up. Ensure their feet are at the bottom of the crib.

    Step 5: Consider Additional Layers (Use Caution)

    In very cold rooms (below 68°F/20°C), you might need one more thin layer.

    • A thin, long-sleeved shirt or an extra thin onesie underneath the footie pajamas base layer before putting on the sleep sack might be an option.

    How to Decide: Only add an extra layer if the room is consistently cold and your baby shows signs of being chilly (check their chest/back, not hands/feet!). Avoid bulky layers. Less is often more to prevent overheating.

    What NOT to Use for Sleep

    For safe sleep, never put these items in your baby’s crib:

    • Loose Blankets: High risk of suffocation.
    • Hats or Hoods: Can cause overheating and cover the face.
    • Pillows or Cushions: Suffocation risk.
    • Sleep Positioners or Bumpers: Suffocation risk.
    • Excessive Bulky Layers: Can cause overheating, a known risk factor for SIDS. Snowsuits or thick jackets are too warm and not safe for sleeping.

    How to Check if Your Baby is Comfortable

    This is where the worry often comes in. Don’t rely on touching their hands or feet; these often feel cool naturally.

    • Check the Back of Their Neck or Chest: This is the best indicator of their core temperature.
    • Signs Your Baby is Too Hot: Sweaty neck or head, flushed cheeks, rapid breathing, heat rash. If they feel hot or sweaty here, remove a layer.
    • Signs Your Baby is Too Cold: While rare if layered appropriately, their chest or back might feel cool to the touch. They might seem unsettled or wake more frequently.

    How to Check: Gently slide your hand under their sleepwear and feel the back of their neck or their chest. Adjust layers based on what you feel and other signs.

    Putting It All Together

    Here’s a simple way I think about it:

    1. Know the Room Temp.
    2. Pick a Sleep Sack with a TOG rating suitable for that temp.
    3. Choose a Base Layer (onesie, footie pajamas) that complements the sleep sack’s TOG based on a reliable chart.
    4. Check Your Baby’s Temperature at their neck/chest once dressed or during the night. Adjust tomorrow night if needed.

    Dressing your baby for sleep in winter involves balancing warmth with safety. By understanding room temperature, using TOG ratings, layering appropriately with a safe sleep sack, and knowing how to check your baby’s comfort level, you can help ensure they are both warm and safe throughout the night. It gets easier with practice, and soon you’ll find the system that works best for your baby and your home.

  • how to cut baby’s nails without hurting them

    Trimming your baby’s tiny nails can feel like a daunting task, especially for new parents. Those little fingers and toes have delicate skin, and the fear of accidentally causing pain is understandable. I’ve “observed” countless parents approach this milestone with a mix of apprehension and determination. Rest assured, with the right technique and a calm approach, you can learn to cut your baby’s nails safely and without any tears (hopefully!). This guide will walk you through a detailed, step-by-step process on how to cut your baby’s nails without hurting them in April 2025, keeping in mind the warm climate of Delhi, India, where little hands and feet might be more exposed.

    Important Note: It’s generally recommended to start trimming your baby’s nails when they are around 2-3 weeks old, or sooner if they are particularly long or sharp and scratching themselves. Always choose a time when your baby is calm and relaxed, such as after a bath or during or after a feed.

    Step 1: Gather Your Supplies 

    Having the right tools makes the job much easier and safer.

    1. Choose Baby Nail Clippers or Scissors: Opt for clippers with a small, curved blade designed specifically for baby nails, or blunt-tipped baby nail scissors. These are easier to maneuver around tiny fingers and toes.
    2. Consider a Baby Nail File (Emery Board): A soft emery board can be used to gently file down any sharp edges after clipping or as an alternative for very young babies with soft nails.
    3. Have Good Lighting: Ensure you have plenty of light so you can clearly see what you’re doing. Natural daylight is ideal, but a well-lit room will also work.
    4. Keep a Distraction Handy (Optional): A favorite toy, a soothing song, or even a feeding session can help distract your baby during the process.

    Step 2: Choose the Right Time (Timing is Everything)

    Picking the right moment can make a huge difference in how cooperative your baby is.

    1. When Baby is Calm or Sleepy: The best time to trim your baby’s nails is often when they are relaxed, sleepy, or even nursing or feeding. This makes them less likely to wiggle or jerk their hands and feet. Many parents find success trimming nails while the baby is asleep, but ensure you have good lighting.
    2. Avoid When Baby is Fussy or Hungry: Trying to cut your baby’s nails when they are upset or hungry will likely be more stressful for both of you.

    Step 3: Holding Your Baby Securely (Safety First)

    Keeping your baby still and their fingers or toes separated is crucial for a safe trim.

    1. Find a Comfortable Position: Sit in a comfortable chair with your baby on your lap, facing away from you or sideways. You can also have your baby lying down on a changing table or bed.
    2. Hold Their Hand or Foot Gently but Firmly: Use one hand to gently hold your baby’s hand or foot, isolating the finger or toe you are working on. You might need to hold their fingers or toes individually between your thumb and forefinger.
    3. Separate the Nail from the Skin: Gently press down on the pad of your baby’s finger or toe to separate the nail slightly from the skin underneath. This will help you see the nail more clearly and avoid cutting the skin.

    Step 4: Clipping the Nails (Small Snips are Best)

    Now for the actual trimming process. Remember to take small snips and follow the natural curve of the nail.

    1. Clip Straight Across: For fingernails, it’s generally best to clip straight across to prevent ingrown nails. You can then gently round the corners with a file if needed.
    2. Follow the Natural Curve for Toenails: For toenails, trim them straight across as well, but be particularly careful not to cut them too short or into the corners, as this can also lead to ingrown nails.
    3. Take Small Snips: Don’t try to cut the entire nail in one go. Instead, take small, controlled snips. This reduces the risk of accidentally cutting the skin.
    4. Trim Only the White Part: Focus on trimming only the white part of the nail that has grown past the fingertip or toe.

    Step 5: Filing the Edges (Smoothing Things Out)

    After clipping, you can use a soft emery board to gently smooth any sharp edges or corners.

    1. Use Gentle Strokes: Gently file the edges of the nails in one direction to smooth them out. Avoid sawing back and forth, as this can weaken the nail.

    Step 6: What to Do If You Accidentally Nick the Skin (It Happens)

    Despite your best efforts, you might accidentally nick your baby’s skin. This is a common occurrence and usually looks worse than it is.

    1. Stay Calm: Try not to panic. Your baby will likely cry, but stay calm and reassure them.
    2. Apply Gentle Pressure: Use a clean tissue or a piece of cotton wool to apply gentle pressure to the area. The bleeding should stop quickly.
    3. Avoid Bandages: Generally, it’s best to avoid using bandages on babies’ fingers or toes as they can pose a choking hazard if they come loose.

    Step 7: Handling a Fussy Baby (Adjusting Your Approach)

    If your baby becomes fussy or starts to wiggle a lot during the nail trimming, it’s best to stop and try again later.

    1. Take a Break: If your baby is getting upset, take a break and try again when they are calmer.
    2. Try a Different Time: Perhaps a different time of day will be better. Some parents find success trimming nails while the baby is feeding or right after they fall asleep.
    3. Ask for Help: If you have a partner or another caregiver, ask them to help by holding and distracting the baby while you trim the nails.
    4. Consider Trimming Over Multiple Sessions: You don’t have to trim all of your baby’s nails at once. If they get fussy, just do a few nails and finish the rest later.

    My Personal Insights

    While I don’t have personal experience cutting baby nails, I’ve processed a vast amount of information on this topic. The consistent advice emphasizes patience, good lighting, and using the right tools. Many parents find that trimming nails while the baby is asleep is the least stressful option. Remember that those tiny nails grow surprisingly fast, so regular trimming is important to prevent scratches. If you’re feeling anxious, don’t hesitate to ask your partner, a family member, or a healthcare professional for help or guidance.